In this article, we will go into detail on how to customize Flowable’s engine. Three changes to the engine will be done:
- Change the database connection by modifying the data source and adding custom data source properties.
- Use a strong UUID generator.
- Implement a custom event handler.
Contribute Code
If you would like to become an active contributor to this project please follow these simple steps:
- Fork it
- Create your feature branch
- Commit your changes
- Push to the branch
- Create new Pull Request
What you’ll need
- About 40 minutes
- A favorite IDE. In this post, we use Intellij Community
- JDK 7 or later. It can be made to work with JDK6, but it will need configuration tweaks. Please check the Spring Boot documentation
Starting with Spring Initializr
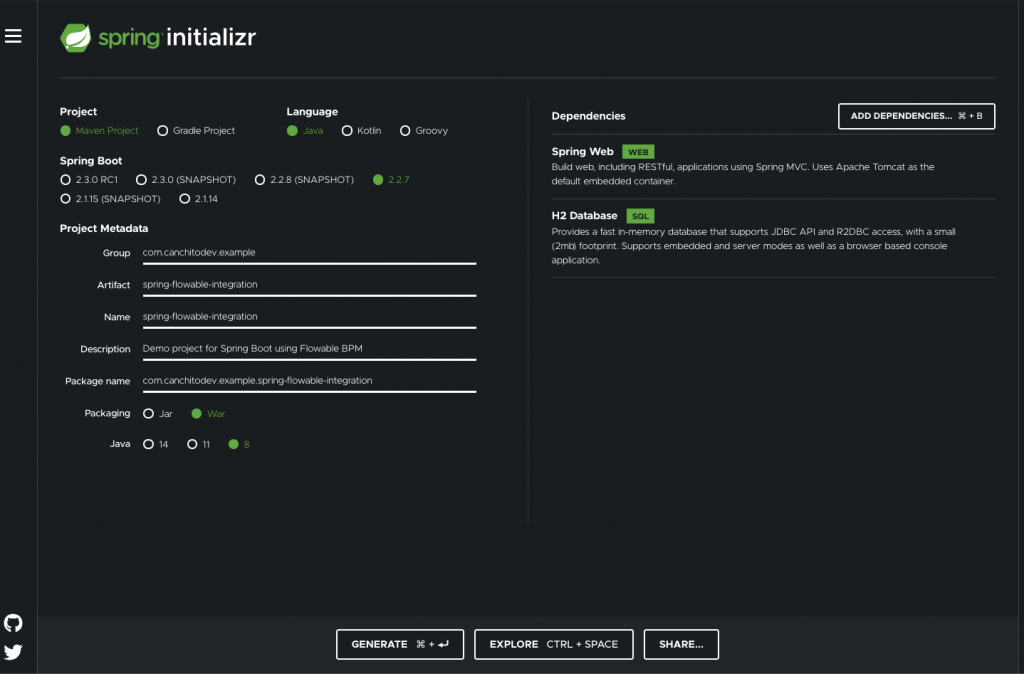
For all Spring applications, it is always a good idea to start with the Spring Initializr. The Initializr is an excellent option for pulling in all the dependencies you need for an application and does a lot of the setup for you. This example needs only the Spring Web, and H2 Database dependency. The following image shows the Initializr set up for this sample project:
The following listing shows the pom.xml file that is created when you choose Maven:
<?xml version="1.0" encoding="UTF-8"?>
<project xmlns="http://maven.apache.org/POM/4.0.0" xmlns:xsi="http://www.w3.org/2001/XMLSchema-instance" xsi:schemaLocation="http://maven.apache.org/POM/4.0.0 https://maven.apache.org/xsd/maven-4.0.0.xsd">
    <modelVersion>4.0.0</modelVersion>
    <parent> <groupId>org.springframework.boot</groupId>
        <artifactId>spring-boot-starter-parent</artifactId>
        <version>2.2.7.RELEASE</version>
        <relativePath/> <!-- lookup parent from repository -->
    </parent>
    <groupId>com.canchitodev.example</groupId>
    <artifactId>flowable-custom-engine-configuration</artifactId>
    <version>0.0.1-SNAPSHOT</version>
    <packaging>war</packaging>

    <name>flowable-custom-engine-configuration</name>
    <description>Demo project for Spring Boot using Flowable BPM</description>

    <organization>
        <name>Canchito Development</name>
        <url>http://www.canchito-dev.com</url>
    </organization>
    <issueManagement>
        <system>Canchito Development</system>
        <url>https://github.com/canchito-dev/spring-flowable-integration/issues</url>
    </issueManagement>
    <url>https://github.com/canchito-dev/spring-flowable-integration</url>

    <properties>
        <project.build.sourceEncoding>UTF-8</project.build.sourceEncoding>
        <project.reporting.outputEncoding>UTF-8</project.reporting.outputEncoding>
        <java.version>1.8</java.version>
        <flowable.version>6.5.0</flowable.version>
    </properties>

    <dependencies>
        <!-- Starter for building web, including RESTful, applications using Spring MVC. Uses Tomcat as the default embedded container -->
        <dependency>
            <groupId>org.springframework.boot</groupId>
            <artifactId>spring-boot-starter-web</artifactId>
        </dependency>
        <!-- Starter for building web, including RESTful, applications using Spring MVC. Uses Tomcat as the default embedded container -->

        <!-- H2 Database Engine -->
        <dependency>
            <groupId>com.h2database</groupId>
            <artifactId>h2</artifactId>
            <scope>runtime</scope>
        </dependency>
        <!-- H2 Database Engine -->

        <!-- Starter for using Tomcat as the embedded servlet container. Default servlet container starter used by spring-boot-starter-web -->
        <dependency>
            <groupId>org.springframework.boot</groupId>
            <artifactId>spring-boot-starter-tomcat</artifactId>
        </dependency>
        <!-- Starter for using Tomcat as the embedded servlet container. Default servlet container starter used by spring-boot-starter-web -->

        <!-- Starter for testing Spring Boot applications with libraries including JUnit, Hamcrest and Mockito -->
        <dependency>
            <groupId>org.springframework.boot</groupId>
            <artifactId>spring-boot-starter-test</artifactId>
            <scope>test</scope>
            <exclusions>
                <exclusion>
                    <groupId>org.junit.vintage</groupId>
                    <artifactId>junit-vintage-engine</artifactId>
                </exclusion>
            </exclusions>
        </dependency>
        <!-- Starter for testing Spring Boot applications with libraries including JUnit, Hamcrest and Mockito -->
    </dependencies>

    <build>
        <plugins>
            <plugin>
                <groupId>org.springframework.boot</groupId>
                <artifactId>spring-boot-maven-plugin</artifactId>
            </plugin>
        </plugins>
    </build>
</project>
Adding Flowable’s Dependencies
Now, simply add flowable-spring-boot-starter dependency. This will add all the engines.
<!-- Flowable Spring Boot Starter Basic -->
<dependency>
    <groupId>org.flowable</groupId>
    <artifactId>flowable-spring-boot-starter-basic</artifactId>
    <version>${flowable.version}</version>
</dependency>
<!-- Flowable Spring Boot Starter Basic -->
That’s all that’s needed. This dependency will transitively add the correct Flowable dependencies to the classpath. You can now run your Spring Boot application.
Customizing Engine Configuration
It is very easy to change and customize the engine configuration, simple by implementing the interface org.flowable.spring.boot.EngineConfigurationConfigurer<T>. Where T is the Spring Type of the particular Engine Configuration. This can be useful for advanced configuration settings or simply because a property has not been exposed (yet).
By exposing an instance of this class as an @Bean in the Spring Boot configuration, the instance will be called before the process engine is fully created.
So, let’s first create the @Bean that will expose the engine configuration. Create a class called CustomEngineConfiguration. The code should look like the following code sniff:
@Primary
@Configuration
@AutoConfigureOrder(Ordered.LOWEST_PRECEDENCE)
@AutoConfigureAfter(ProcessEngineAutoConfiguration.class)
public class CustomEngineConfiguration {
  @Bean
  EngineConfigurationConfigurer<SpringProcessEngineConfiguration> engineConfigurationConfigurer() {
    return engineConfiguration -> {};
  }
}
Note that we have added @AutoConfigureOrder annotation so that Spring framework can order the classes among themselves without affecting the order of configuration classes; and @AutoConfigureAfter annotation which tell the framework that this configuration should be applied after other specified auto-configuration classes.
This should be enough to create a @Bean that let’s you modify and customize the engine. Now let’s continue and customize the database connection using custom data properties.
Custom Data Source
By default, you can easily change the data source configuration using Spring Boot data source properties. But we do not just want to change the connection string or the user credentials. We want to change other properties such as the connection pool size, its name, etc. Open the application.properties file and add the following properties:
flowable.datasource.username=flowable
flowable.datasource.password=flowable
flowable.datasource.url=jdbc:h2:~/flowable-db/db
flowable.datasource.driver-class-name=org.h2.Driver
flowable.datasource.connection-timeout=60000
flowable.datasource.connection-test-query=SELECT 1
flowable.datasource.pool-name=flowable-db-pool
flowable.datasource.maximum-pool-size=15
flowable.datasource.minimum-idle=5
flowable.datasource.max-lifetime=60001
flowable.datasource.idle-timeout=60002
Next, go to the CustomEngineConfiguration class and add a new @Bean which will load the newly created properties into DataSourceProperties base class for configuration of a data source.
@Primary
@Bean
@ConfigurationProperties("flowable.datasource")
public DataSourceProperties flowableDataSourceProperties() {
  return new DataSourceProperties();
}
Right below this @Bean, add a new one, which will create an instance of the data source. Note that we are using the @Qualifier annotation for specifying which properties @Bean should be used.
@Primary
@Bean
public HikariDataSource flowableDataSource(
      @Qualifier("flowableDataSourceProperties") DataSourceProperties flowableDataSourceProperties
) {
   return flowableDataSourceProperties
         .initializeDataSourceBuilder()
         .type(HikariDataSource.class)
         .build();
}
Finally, change the engine to use the recently created data source @Bean for connecting to the database. The EngineConfigurationConfigurer @Bean should look something like this:
@Bean
EngineConfigurationConfigurer<SpringProcessEngineConfiguration> engineConfigurationConfigurer(
  @Qualifier("flowableDataSource") DataSource dataSource
) {
  return engineConfiguration -> {
    engineConfiguration.setDataSource(dataSource);
  };
}
Again, we have passed the data source that we want to use, and annotated it with @Qualifier so that Spring know exactly which @Bean to use. Very simple right!?
Strong UUID ID generator for high concurrency
Each engine has a default ID generator. This generator reserves a block of IDs in the database, so that no other engine can use them. While the engine is performing operations at runtime, when the default ID generator notices that there are no more available IDs, a new transaction is started to fetch new ones. In some high concurrency cases with a heavy load of request to the ID generator, the default ID generator may cause exceptions due to not being able to fetch new ID blocks quickly enough.
The alternative to the default ID generator is the org.flowable.engine.impl.persistence.StrongUuidGenerator, which generates a unique UUID locally and uses that as an identifier for all entities. Since the UUID is generated without the need for database access, it copes better with very high concurrency use cases. To use the StrongUuidGenerator, simply add it to the EngineConfigurationConfigurer @Bean as follow:
@Bean
EngineConfigurationConfigurer<SpringProcessEngineConfiguration> engineConfigurationConfigurer(
  @Qualifier("flowableDataSource") DataSource dataSource
) {
  return engineConfiguration -> {
    engineConfiguration.setDataSource(dataSource);

    /**
     * Flowable DOCS (v6.5.0)'s user guide - UUID ID generator for high concurrency
     * https://flowable.com/open-source/docs/bpmn/ch18-Advanced/#uuid-id-generator-for-high-concurrency
     **/
    engineConfiguration.setIdGenerator(new StrongUuidGenerator());
  };
}
Custom Event handlers
Flowable’s engine event mechanism notifies you when various events occur within the engine. It’s possible to register a listener for certain types of events as opposed to getting notified when any type of event is dispatched.
You can either:
– add engine-wide event listeners through the configuration,
– add engine-wide event listeners at runtime using the API or
– add event-listeners to specific process definitions in the BPMN XML
For our example, we will add engine-wide event listeners through the configuration.
First create a class with the name CustomEventHandler. The only requirement for an event-listener is to implement org.flowable.engine.delegate.event.FlowableEventListener.
public class CustomEventHandler implements FlowableEventListener {

  private static final Logger log = LogManager.getLogger(CustomEventHandler.class);

  @Override
  public void onEvent(FlowableEvent event) {
    switch ((FlowableEngineEventType) event.getType()) {
      case PROCESS_STARTED:
        log.info(event.toString());
        break;
      case PROCESS_COMPLETED:
        log.info(event.toString());
        break;
    }
  }

  @Override
  public boolean isFailOnException() {
    return false;
  }

  @Override
  public String getOnTransaction() {
     return null;
  }

  @Override
  public boolean isFireOnTransactionLifecycleEvent() {
     return false;
  }
}
For our example, we are logging in the console the events fired by Flowable’s engine whenever a process is started or completed.
We will not go into details on what each of the overridden method do. If you have doubts about them, please leave a comment and we will gladly give you a hand.
Once we have this class, we need to tell the engine there is a new event handler, by registering it. To do so, simply add it to the EngineConfigurationConfigurer @Bean as follow:
@Bean
EngineConfigurationConfigurer<SpringProcessEngineConfiguration> engineConfigurationConfigurer(
  @Qualifier("flowableDataSource") DataSource dataSource
) {
  return engineConfiguration -> {
    engineConfiguration.setDataSource(dataSource);

    engineConfiguration.setIdGenerator(new StrongUuidGenerator());

    /**
     * Flowable DOCS (v6.5.0)'s user guide - Event handlers * https://flowable.com/open-source/docs/bpmn/ch03-Configuration/#event-handlers
     **/
     engineConfiguration.setEventListeners(Arrays.<FlowableEventListener>asList(new CustomEventHandler()));
  };
}
If you execute a process, in the console you will see a log line as the one shown here whenever a process is started or completed:
2020-06-08 09:49:18.153  INFO 18397 --- [ main] c.c.c.configuration.CustomEventHandler   : class org.flowable.engine.delegate.event.impl.FlowableProcessStartedEventImpl - PROCESS_STARTED
2020-06-08 09:49:18.395  INFO 18397 --- [ main] c.c.c.configuration.CustomEventHandler   : class org.flowable.engine.delegate.event.impl.FlowableEntityEventImpl - PROCESS_COMPLETED
Summary
In this post, we have shown how to customize Flowable’s engine by performing three changes: change the database connection by modifying the data source and adding custom data source properties; use a strong UUID generator; and implementing a custom event handler.
We hope that, even though this was a very basic introduction, you understood how to customize the engine. We will try to go deeper into Flowable in upcoming posts. Please feel free to contact us. We will gladly response to any doubt or question you might have.
Source code can be found in our GitHub repository.