Create Custom Service Tasks for Flowable
In this tutorial, we will be implementing a custom service task in Flowable
Contribute Code
If you would like to become an active contributor to this project please follow these simple steps:
- Fork it
- Create your feature branch
- Commit your changes
- Push to the branch
- Create new Pull Request
What you’ll need
- About 40 minutes
- A favorite IDE. In this post, we use Intellij Community
- JDK 7 or later. It can be made to work with JDK6, but it will need configuration tweaks. Please check the Spring Boot documentation
Starting with Spring Initializr
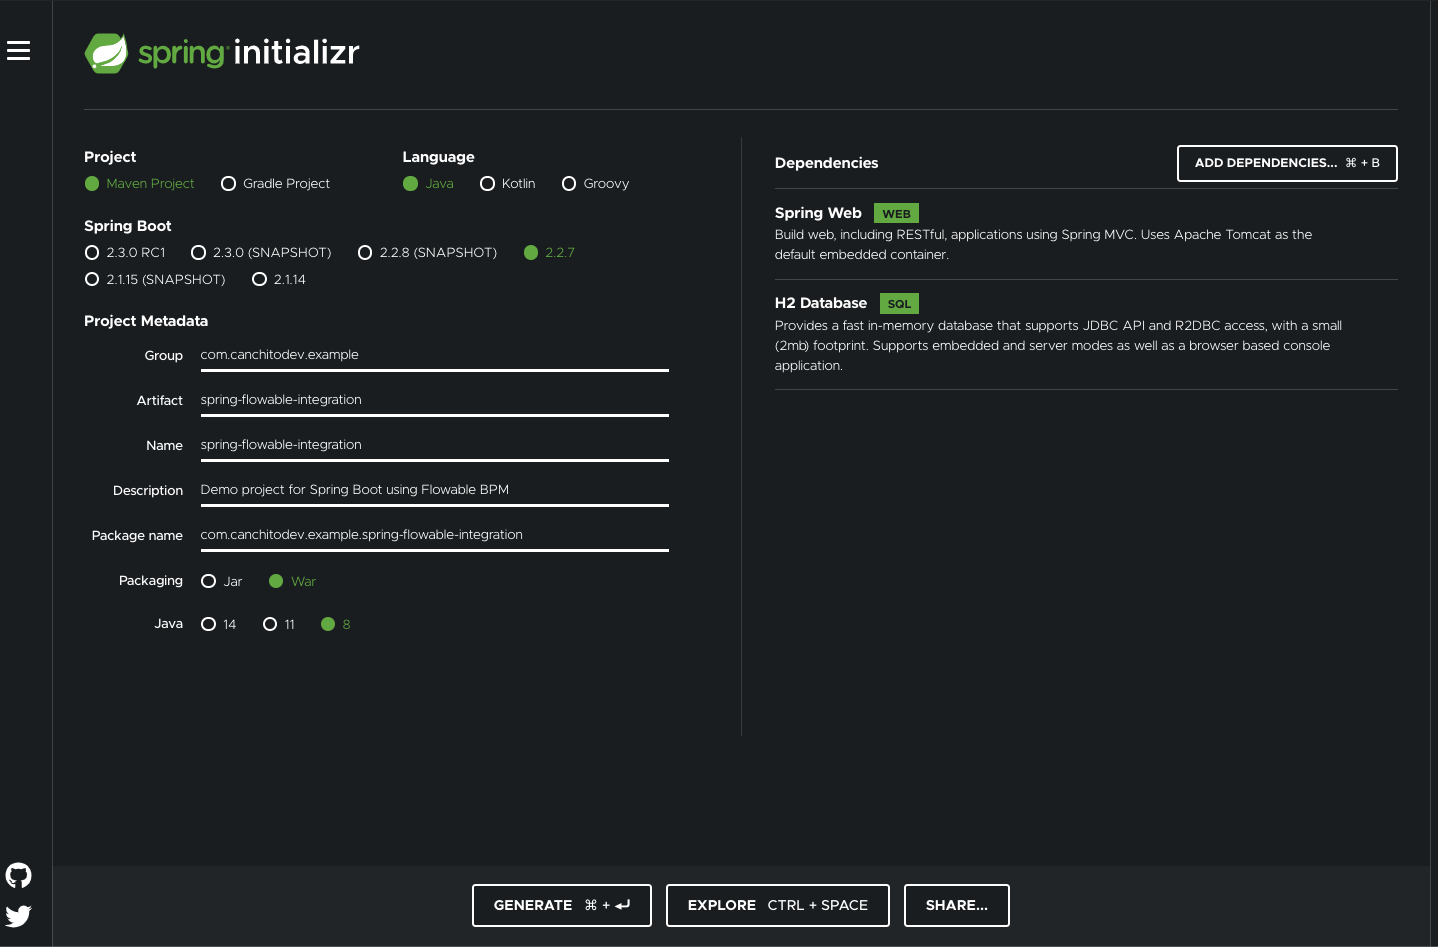
For all Spring applications, it is always a good idea to start with the Spring Initializr. The Initializr is an excellent option for pulling in all the dependencies you need for an application and does a lot of the setup for you. This example needs only the Spring Web, and H2 Database dependency. The following image shows the Initializr set up for this sample project:
The following listing shows the `pom.xml` file that is created when you choose Maven:
<?xml version="1.0" encoding="UTF-8"?> <project xmlns="http://maven.apache.org/POM/4.0.0" xmlns:xsi="http://www.w3.org/2001/XMLSchema-instance" xsi:schemaLocation="http://maven.apache.org/POM/4.0.0 https://maven.apache.org/xsd/maven-4.0.0.xsd">
  <modelVersion>4.0.0</modelVersion>
  <parent>
    <groupId>org.springframework.boot</groupId>
    <artifactId>spring-boot-starter-parent</artifactId>
    <version>2.2.7.RELEASE</version>
    <relativePath/> <!-- lookup parent from repository -->
  </parent>
  <groupId>com.canchitodev.example</groupId>
  <artifactId>spring-flowable-integration</artifactId>
  <version>0.0.1-SNAPSHOT</version>
  <packaging>war</packaging>

  <name>spring-flowable-integration</name>
  <description>Demo project for Spring Boot using Flowable BPM</description>

  <organization> <name>Canchito Development</name>
    <url>http://www.canchito-dev.com</url>
  </organization>
  <issueManagement>
    <system>Canchito Development</system>
    <url>https://github.com/canchito-dev/spring-flowable-integration/issues</url>
  </issueManagement>
  <url>https://github.com/canchito-dev/spring-flowable-integration</url>

    <properties>
    <project.build.sourceEncoding>UTF-8</project.build.sourceEncoding>
    <project.reporting.outputEncoding>UTF-8</project.reporting.outputEncoding>
    <java.version>1.8</java.version>
      <flowable.version>6.5.0</flowable.version>
  </properties>

  <dependencies>
    <!-- Starter for building web, including RESTful, applications using Spring MVC. Uses Tomcat as the default embedded container -->
    <dependency>
      <groupId>org.springframework.boot</groupId>
      <artifactId>spring-boot-starter-web</artifactId>
    </dependency>
    <!-- Starter for building web, including RESTful, applications using Spring MVC. Uses Tomcat as the default embedded container -->

    <!-- H2 Database Engine -->
    <dependency>
      <groupId>com.h2database</groupId>
      <artifactId>h2</artifactId>
      <scope>runtime</scope>
    </dependency>
    <!-- H2 Database Engine -->

    <!-- Starter for using Tomcat as the embedded servlet container. Default servlet container starter used by spring-boot-starter-web -->
    <dependency>
      <groupId>org.springframework.boot</groupId>
      <artifactId>spring-boot-starter-tomcat</artifactId>
    </dependency>
    <!-- Starter for using Tomcat as the embedded servlet container. Default servlet container starter used by spring-boot-starter-web -->

    <!-- Starter for testing Spring Boot applications with libraries including JUnit, Hamcrest and Mockito -->
    <dependency>
      <groupId>org.springframework.boot</groupId>
      <artifactId>spring-boot-starter-test</artifactId>
      <scope>test</scope>
      <exclusions>
        <exclusion>
          <groupId>org.junit.vintage</groupId>
          <artifactId>junit-vintage-engine</artifactId>
        </exclusion>
      </exclusions>
    </dependency>
    <!-- Starter for testing Spring Boot applications with libraries including JUnit, Hamcrest and Mockito -->
  </dependencies>
  <build>
    <plugins>
      <plugin>
        <groupId>org.springframework.boot</groupId>
        <artifactId>spring-boot-maven-plugin</artifactId>
      </plugin>
    </plugins>
  </build>
</project>
Adding Flowable’s Dependencies
Now, simply add flowable-spring-boot-starter dependency. This will add all the engines.
<!-- Flowable Spring Boot Starter Basic -->
<dependency>
  <groupId>org.flowable</groupId>
  <artifactId>flowable-spring-boot-starter-basic</artifactId>
  <version>${flowable.version}</version></dependency>
<!-- Flowable Spring Boot Starter Basic -->

```xml
<!-- Flowable Spring Boot Starter Rest Api -->
<dependency>
  <groupId>org.flowable</groupId>
  <artifactId>flowable-spring-boot-starter-rest</artifactId>
  <version>${flowable.version}</version>
</dependency>
<!-- Flowable Spring Boot Starter Rest Api -->
That’s all that’s needed. This dependency will transitively add the correct Flowable dependencies to the classpath. You can now run your Spring Boot application. But before you do, create the following folders under src/main/resources:
src
 |- main
    |- resources
       |- processes
       |- cases
       |- dmn
       |- forms
If you would like to know a bit more on how to integrate Flowable in our Spring Boot application, have a look at our post Integrate Flowable into your Spring Boot Application.
Implementation
In order to customize the behavior of a service task, a class that implements the org.flowable.engine.delegate.JavaDelegate interface needs to be created, and its respective logic provided in the execute method. When process execution arrives at this particular step, it will execute the logic defined in that method and leave the activity in the default BPMN 2.0 way.
Let’s create, for example, a Java class that just prints a text in the log. This class needs to implement the org.flowable.engine.delegate.JavaDelegate interface, which requires us to implement the execute(DelegateExecution) method. This last method is the one that Flowable will call, and thus, it is the one that needs to have the logic that will be executed. So, create a class and call it MyFirstDelegate:
@Service("myFirstDelegate")
@Scope("prototype")
public class MyFirstDelegate implements JavaDelegate {

    public void execute(DelegateExecution execution) {
        System.out.println("This is my first custom service task");
  }
}
Notice that we have included the Spring annotations @Service and @Scope. The @Service annotations will help us create an instance of the class, while @Scope tell Spring to create a new instance whenever needed. This is useful because there are a few situations where thread-safety is not guaranteed, depending on the setup or environment Flowable is running in.
The easiest solution to avoid thread-safety issues, is to return a new instance of the delegate class each time the delegate expression is resolved. For example, when using Spring, this means that the scope of the bean must be set to prototype (such as by adding the @Scope(SCOPE_PROTOTYPE) annotation to the delegate class). Just as we just did.
Let’s continue by creating a process that uses our delegate class. Inside the folder src/main/resources/processes, create a file named my-first-custom-service-task.bpmn20.bpmn20.xml. This is a dummy process definition. The content of the file is below:
<?xml version="1.0" encoding="UTF-8"?>
<definitions xmlns="http://www.omg.org/spec/BPMN/20100524/MODEL" xmlns:xsi="http://www.w3.org/2001/XMLSchema-instance" xmlns:xsd="http://www.w3.org/2001/XMLSchema" xmlns:flowable="http://flowable.org/bpmn" xmlns:bpmndi="http://www.omg.org/spec/BPMN/20100524/DI" xmlns:omgdc="http://www.omg.org/spec/DD/20100524/DC" xmlns:omgdi="http://www.omg.org/spec/DD/20100524/DI" typeLanguage="http://www.w3.org/2001/XMLSchema" expressionLanguage="http://www.w3.org/1999/XPath" targetNamespace="http://www.flowable.org/processdef">
  <process id="myFirstCustomServiceTask" name="My First Custom Service Task" isExecutable="true">
    <documentation>This is an example of my first custom service task</documentation>
    <startEvent id="startEvent1" flowable:formFieldValidation="true"></startEvent>
    <sequenceFlow id="sid-E02AD7E3-FE89-462C-86E5-F28860E7D03A" sourceRef="startEvent1" targetRef="sid-DD49004C-1B9B-4CD2-96C6-263B49A91B04"></sequenceFlow>
    <serviceTask id="sid-DD49004C-1B9B-4CD2-96C6-263B49A91B04" name="My First Delegate" flowable:delegateExpression="${myFirstDelegate}"></serviceTask>
    <endEvent id="sid-FBAC523F-3400-43D2-B278-9F2068353C8F"></endEvent>
    <sequenceFlow id="sid-30C0434C-E743-4CE7-9BB8-C1AA92FAEAC2" sourceRef="sid-DD49004C-1B9B-4CD2-96C6-263B49A91B04" targetRef="sid-FBAC523F-3400-43D2-B278-9F2068353C8F"></sequenceFlow>
  </process>
</definitions>
For simplicity, we will create a REST endpoint that will let us start a new instance of this recently created process definition. Create a class and call it MyRestController, and add the following code:
@RestController
public class MyRestController {
  @Autowired
  private RuntimeService runtimeService;

  @PostMapping(value="/process/{processDefinitionKey}")
    public void startProcessInstance(
      @PathVariable(required = true) String processDefinitionKey
    ) {
      runtimeService.startProcessInstanceByKey(processDefinitionKey);
  }
}
The endpoint receives as parameter, the process definition id found as path variable. Call it, using cURL or Postman as follow: POST http://localhost:8080/process/myFirstCustomServiceTask. If everything went well, you should see a log line with this text `This is my first custom service task`.
Field Injection
Field injection is supported when using the ‘flowable:class’ attribute. To inject values that are dynamically resolved at runtime, expressions can be used. Those expressions can use process variables. Create a class and call it MyFirstFieldInjection:
@Service("myFirstFieldInjection")
@Scope("prototype")
public class MyFirstFieldInjection implements JavaDelegate {

  private Expression name;

  public void execute(DelegateExecution execution) {
    System.out.println(String.format("Hello %s!", (String) name.getValue(execution)));
  }
}
To test it, create a file named my-first-field-injection.bpmn20.xml inside the folder src/main/resources/processes. This is a dummy process definition. The content of the file is below:
<?xml version="1.0" encoding="UTF-8"?>
<definitions xmlns="http://www.omg.org/spec/BPMN/20100524/MODEL" xmlns:xsi="http://www.w3.org/2001/XMLSchema-instance" xmlns:xsd="http://www.w3.org/2001/XMLSchema" xmlns:flowable="http://flowable.org/bpmn" xmlns:bpmndi="http://www.omg.org/spec/BPMN/20100524/DI" xmlns:omgdc="http://www.omg.org/spec/DD/20100524/DC" xmlns:omgdi="http://www.omg.org/spec/DD/20100524/DI" typeLanguage="http://www.w3.org/2001/XMLSchema" expressionLanguage="http://www.w3.org/1999/XPath" targetNamespace="http://www.flowable.org/processdef">
    <process id="myFirstFieldInjection" name="My First Field Injection" isExecutable="true">
        <startEvent id="startEvent1" flowable:formFieldValidation="true"></startEvent>
        <sequenceFlow id="sid-D837E274-632E-4E81-88E5-72EAA43E0200" sourceRef="startEvent1" targetRef="sid-E61DC16F-D9D7-4D83-A5DC-44131A4188F0"></sequenceFlow>
        <serviceTask id="sid-E61DC16F-D9D7-4D83-A5DC-44131A4188F0" name="My First Field Injection Task" flowable:delegateExpression="${myFirstFieldInjection}">
            <extensionElements>
                <flowable:field name="name">
                    <flowable:string><![CDATA[canchito-dev]]></flowable:string>
                </flowable:field>
            </extensionElements>
        </serviceTask>
        <endEvent id="sid-03CFCEE6-9EBF-4386-9CE4-8A791DBB56B9"></endEvent>
        <sequenceFlow id="sid-3B4BA00A-8E1F-43E9-9D49-EC3DAF03F16B" sourceRef="sid-E61DC16F-D9D7-4D83-A5DC-44131A4188F0" targetRef="sid-03CFCEE6-9EBF-4386-9CE4-8A791DBB56B9"></sequenceFlow>
    </process>
</definitions>
Use our previously created to start a new process instances of our newly created process. Call it, using cURL or Postman as follow: POST http://localhost:8080/process/myFirstFieldInjection. If everything went well, you should see a log line with this text `Hello canchito-dev!`.
Summary
In this post, we have shown how to create custom service task in Flowable. We hope that, even though this was a very basic introduction, you understood how to use and configure them. We will try to go deeper into Flowable in upcoming posts.
Please feel free to contact us. We will gladly response to any doubt or question you might have.
Source code can be found in our GitHub repository.